How to Clean Printed Circuit Boards Safely and Effectively

Printed circuit boards, or PCBs, are the heart of almost all electronic devices. They connect and support all the electronic parts, making sure the device works properly. Keeping a PCB clean is very important because dirt, dust, and oil can cause problems, like short circuits or poor performance.
In this article, we will explain how to clean PCBs safely and effectively. You will learn easy methods and important tips to protect your boards, whether you are an engineer, a technician, or a hobbyist. By following these steps, you can keep your electronics working longer and more reliably.
Why You Need to Clean PCBs
A PCB covered in dust, oil, or debris can stop working properly. Cleaning your PCB is not just about making it look nice—it prevents electrical problems, corrosion, and device failures. Understanding why cleaning matters helps you protect your electronics and make the right maintenance decisions.
1. The Impact of Dirt, Dust, and Oil
Over time, dust, oil, and other debris naturally accumulate on a PCB. These contaminants can:
l Block electrical connections – Dust can create tiny gaps between soldered joints and component leads, reducing conductivity.
l Cause short circuits – If dust or oily residue bridges two circuits, electricity may flow where it shouldn’t, damaging components.
l Lead to corrosion – Moisture and dirt can react with metal parts, slowly eating away at copper traces or solder pads.
l Reduce device performance – Even small amounts of contamination can affect sensitive circuits, causing malfunction, signal errors, or complete device failure.
For example, in a home computer, dust buildup on the motherboard can cause overheating or random crashes, while in industrial equipment, it may result in costly downtime.
2. The Importance of Regular Maintenance
Regularly cleaning your PCB helps:
l Extend PCB life – Removing dust and contaminants prevents corrosion and mechanical wear.
l Maintain device reliability – Clean boards are less likely to have short circuits or unstable connections, ensuring consistent performance.
l Prevent costly repairs – Regular cleaning avoids damage that could require replacing the entire board or expensive components.
l Protect sensitive electronics – High-precision circuits, like sensors or controllers, are particularly sensitive to dirt and residue.
In short, keeping your PCB clean is a simple step that prevents bigger problems and ensures your electronics last longer and work reliably.

Preparing to Clean Your PCB
Before cleaning a PCB, it is essential to prepare properly. Good preparation keeps you safe and protects your electronics from damage.
1. Power Off and Safety Measures
Always disconnect the PCB from any power source before cleaning. Never clean a board that is plugged in, as this can cause electric shock or short circuits.
It is also important to wear anti-static protection:
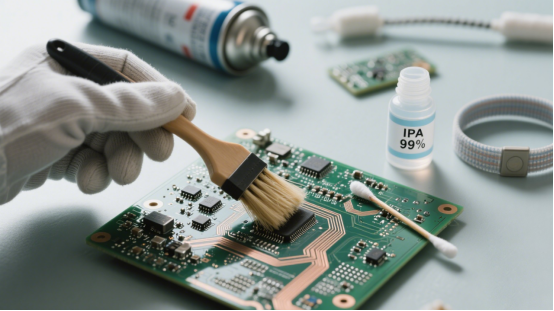
l Anti-static gloves prevent oils from your hands and static electricity from damaging sensitive components.
l Anti-static wristbands safely discharge static electricity from your body, avoiding sudden surges that can fry the PCB.
Safety is the first step, and skipping this can damage both you and your device.
2. Tools and Materials You Will Need
Having the right tools makes cleaning safer and more effective. Some commonly used items include:
l Brushes – soft-bristled brushes are ideal for removing dust from components and small areas.
l Cotton swabs or soft cloths – for gently wiping dirt or residue off soldered joints.
l Isopropyl alcohol (IPA) – a safe cleaning liquid that evaporates quickly without leaving water behind.
l Deionized water – can be used for gentle cleaning, especially when IPA is not available.
l Compressed air or a blow ball – to remove dust from hard-to-reach spots without touching delicate components.
Before you start cleaning, make sure all tools are clean and dry. Using dirty brushes or wet cloths can spread dirt or cause short circuits.
3. Organize Your Workspace
l Work on a clean, flat surface to avoid dropping components.
l Keep all tools and cleaning liquids within easy reach.
l Make sure the area is well-lit, so you can see small details on the PCB.
Proper preparation reduces mistakes, prevents damage, and makes the cleaning process faster and safer.
How to Clean Your PCB
There are several ways to clean a PCB, depending on how dirty it is and what tools you have. Each method has its own advantages and is suitable for different situations.
1. Dry Cleaning Method
Dry cleaning is the simplest method and does not use any liquids. It is best for light dust or surface dirt.
Steps:
l Use a soft brush to gently remove dust from components and solder joints.
l You can also use compressed air or a blow ball to blow away dust from hard-to-reach areas.
l Avoid pressing too hard, as this can bend small components or traces.
Dry cleaning is safe, quick, and avoids any risk of water damage.
2. Wet Cleaning Method
Wet cleaning uses liquids such as isopropyl alcohol (IPA) or deionized water to remove grease, oil, or stubborn dirt.
Steps:
l Dip a cotton swab or soft cloth into IPA or deionized water.
l Gently wipe the solder pads, leads, and component surfaces.
l Make sure not to soak the PCB, as excessive liquid can reach unwanted areas.
l After cleaning, dry the PCB completely with compressed air or let it air dry.
Wet cleaning is effective for sticky residues or older, contaminated boards, but care is needed to avoid moisture damage.
3. Ultrasonic Cleaning Method
Ultrasonic cleaning is a professional method that uses a special ultrasonic cleaning machine to clean complex PCBs or heavily soiled boards.
Steps:
l Place the PCB in a tank with cleaning solution (usually water with mild detergent or IPA-based solution).
l The machine produces high-frequency vibrations that remove dirt and flux residues even from tiny gaps.
l Carefully control the time and temperature to avoid overheating or damaging sensitive components.
l After cleaning, thoroughly rinse and dry the PCB before use.
Ultrasonic cleaning is ideal for complex circuits, multilayer boards, or serious contamination, but it requires the right equipment and careful handling.

After-Cleaning Care for Your PCB
Cleaning a PCB is not finished until you inspect and protect it properly. Following these steps ensures your board stays safe and works reliably.
1. Inspection and Drying
After cleaning your PCB, it is essential to carefully check every component and solder joint:
l Look for loose parts, damaged solder pads, or bent leads.
l Ensure that no liquid residue is left on the board. Even a small amount of moisture can cause short circuits when the PCB is powered on.
l Use compressed air or a soft cloth to remove any remaining liquid, and let the PCB air dry completely in a clean, dust-free area.
Never power on a PCB while it is still wet, as this can permanently damage the board or components.
2. Protection and Maintenance
After cleaning, you should take steps to protect the PCB and prevent future contamination:
l Regular cleaning – Schedule periodic cleaning to prevent dust and grime from building up over time.
l Protective covers – Use dust covers or enclosures to shield the board from dirt, moisture, and accidental contact.
l Careful handling – Always handle PCBs by the edges and avoid touching components with bare hands, as oils from your skin can leave residue.
By following these simple measures, you can keep your PCB clean, safe, and fully functional for a long time.
Common Mistakes and Precautions When Cleaning PCBs
Cleaning a PCB may seem simple, but certain mistakes can damage the board or components. Knowing what to avoid keeps your electronics safe and functional.
1. Using the Wrong Liquids
Not all liquids are safe for cleaning PCBs. Avoid:
l Tap water – contains minerals that can leave residues and cause corrosion.
l Strong acids or bases – these chemicals can eat away at copper traces and solder pads, permanently damaging the board.
Instead, use isopropyl alcohol (IPA) or deionized water, which are safe and evaporate quickly without leaving residues.
2. Cleaning with Excessive Force
Applying too much pressure while cleaning can physically damage the PCB:
l Brushing too hard may scratch solder pads or remove delicate components.
l Pressing too firmly on leads or tiny parts may bend or break them.
Always use gentle motions with soft brushes, cotton swabs, or cloths to protect the board.
3. Not Powering Off Before Cleaning
Cleaning a live PCB is very dangerous:
l It can cause short circuits if moisture or conductive liquids touch multiple traces.
l You may get an electric shock, especially with high-voltage boards.
Always disconnect the power supply and remove batteries or plugs before cleaning. Double-check that the board is completely powered down.

Conclusion
Keeping your PCB clean is essential for reliable and long-lasting electronics. By understanding and following safe cleaning methods—whether dry, wet, or ultrasonic—you can prevent short circuits, corrosion, and component damage.
Always choose the cleaning method that fits your PCB’s condition and handle boards carefully to protect both yourself and your components. Regular maintenance and proper protection make your electronics more reliable and durable.
If you are unsure or want professional help, it is a good idea to consult an expert or use professional PCB cleaning services. For more guidance and high-quality PCB solutions, you can contact PCBMASTER, a trusted PCB supplier, ready to assist you anytime.
FAQs
1. Can I use a regular household vacuum to clean my PCB?
No, a regular vacuum is not recommended. Household vacuums can create static electricity, which may damage sensitive components. They also apply too much suction, which can loosen or break small parts. Instead, use compressed air, blow balls, or a soft anti-static brush to safely remove dust from the PCB.
2. How often should I clean my PCB?
The cleaning frequency depends on the environment and usage:
l Dusty or industrial environments – clean every 1–2 months.
l Home or office electronics – clean every 6–12 months.
l Critical or high-performance boards – inspect and clean more frequently.
Regular checks help prevent buildup of dust and residue, which could lead to overheating or electrical problems.
3. Can I use water alone to clean a PCB?
It is generally not safe to use tap water alone because it contains minerals and impurities that can cause corrosion or leave conductive residue. If water is needed, always use deionized or distilled water, and make sure the PCB is completely dry before powering it on. Adding a small amount of isopropyl alcohol helps remove grease and speeds up drying.
4. What should I do if my PCB has sticky residue from flux?
Sticky flux residue can attract dust and moisture. To clean it:
l Use a cotton swab dipped in isopropyl alcohol (IPA).
l Gently wipe the affected areas, including solder joints and nearby components.
l Repeat if necessary until the residue is gone.
l Ensure the PCB is completely dry before reconnecting power.
Using IPA is effective because it dissolves flux without damaging the PCB or leaving water behind.
5. Is it safe to clean a PCB with components already installed?
Yes, most cleaning methods are safe for fully assembled boards if done carefully:
l Dry cleaning with soft brushes or compressed air is completely safe.
l Wet cleaning with IPA should avoid over-soaking; use minimal liquid and wipe gently.
l Ultrasonic cleaning can be risky for delicate or very large components; check manufacturer recommendations first.
Always ensure power is disconnected and the PCB is completely dry before turning it back on.
